
This is our Frog Birdbath, he attracts all sorts of native birds, including Kookaburras.
The EcoHouse Renovation!
renovate (verb) 1. To spend a vast amount of money you can't afford on a house the bank actually owns, giving up your weekends, and making your life a living hell for months on end so that you can feel a little bit better about the walls you stare at while sitting on your shiny new toilet. 2. An endless cycle of despair.
This is our Frog Birdbath, he attracts all sorts of native birds, including
Kookaburras.
Boondaburra.com describes the renovation of Nicole & David's house "Boondaburra" in Sydney, Australia.
Our goal is to create a house which is as environmentally responsible as practical.
In case you wanted to know, "Boondaburra" is one of the aboriginal names for Nicole's favorite animal, the platypus!
Links
We have designed our our Solar Air Heater called the Solar Sponge. This site has full details on how you can make your own!
Our main web page is here, which has Dave's Electronics, Canyoning, Geocaching, and Internet Dating websites!
EcoThemed Rooms
Each room in the house is themed on an EcoSystem and is colour matched to be as realistic to the related natural ecosystem colours as possible!
The Bar
How to turn a tragic 1980's vintage bar in the lounge room into a much needed walk-in closet!


(L) Everyone wanted to know why we ripped out a perfectly good bar - apart from
being non-drinkers, now you know why! (R) Gone!


(L) What the heck are those damn wires doing in that wall? - Bugger! (R) What
is more fun that ripping out a bar? - knocking down a wall!


Behold! - A new walk-in closet with plenty of adjustable shelving. Note the
slate tile "walkway" which was ripped up. The slate tiles ripped up
from around the bar were reused for the floor in the closet.
The Floor
The slate tiles going around into the old bar in the loungerom just had to
go now that the bar was gone.
So we ripped out the slate tiles and extended the floor boards back to the new
wall. The tiles were actually re-used for the walk-in closet!
Murphys Law of renovation said that the few square meters we wanted to replace
were in the wrong direction to rip up. So we had to rip up the entire
lounge room floor just to lay a few new floor boards. Luckily we could still
get exactly the same type of board, so it cost us next to nothing.


The extended floor boards. You can't even notice the difference. Our lounge
room now feels a lot bigger :)
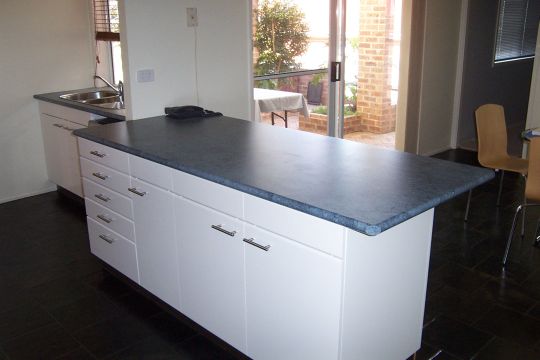
The Kitchen
The vintage 80s kitchen just had
to go.
Instead of renovating the whole thing we just got new benchtops, new appliances
and sink, and painted the cupboard doors and put new handles on. 1/5 the cost
of a complete new kitchen and a lot less material waste.
The cupboard doors were coated with Grip Lock Primer and then spray painted to give a brand new look.
The kitchen theme is The Beach, so we wanted the benchtops to look like the ocean, and chose beach themed tiling.

ARGHHH! - It's an all-cream and wooden handle nightmare straight out of the
80's. It WAS state of the art in it's time!


The old sink (L) and the new Kleenmaid sink and bench (R).


The old sink and benchtop (L), and the new sink and benchtop (R).


Out with the old cooktop (L) and in with the nice new Kleenmaid 4 burner with
wok thingo (R). Much more bench space. The tiles went too...
...and the finished result: 
The exhaust fan still needs a facia panel though.

Out with the old bench (Top) (along with the breakfast bar), and in with the
shiny new much larger Duropal benchtop (Bottom). Note the new painted doors
in gloss white and new door chrome door handles.


Installing the new shelf for the microwave and a new facia panel (L, M). Manufacturing
a custom microwave enclosure (R).


The new microwave enclose just slipped into the cavity on the new shelf and
was such a good fit it doesn't need to be attached! The complete installation
(R).
The Ensuite
The hideous ensuite had to go too, who wanted a PINK and PURPLE bathroom with no room to move? No saving this one, it was a complete renovation.
This is the famous "Rainforest" themed ensuite renovation!

How could anyone move in there with this HUGE vanity!


The old (L) vs the new (R) toilet and vanity. Note the new tiling right to the
roof. To be environmentally friendly, the vanity and cabinet were custom made
from recycled oregan.


Yes, those old tiles (L) were PINK! with a matching darker pink paint on the
walls! *gasp*. New frameless shower Screen and rainforest theme (M, R)


Ripping out the tiles (L), and the shower cavity ready to be tiled (R).

What rainforest themed room would be complete without native Australian rainforest
mosaic tiles!
The Main Bathroom
The main bathroom was our biggest renovation. It involved completely gutting the existing bath and shower, moving pipework and installing a new larger and deeper bath and open show screen. We even installed a custom made glass brick window to allow some natural light to enter the vanity. Not to mention that the entire bathroom was themed on the Antarctic!


(L) The old vanity. (R) The new dual vanity! Note the matching bevelled mirror
light fitting.
We reused the same mirror by simply removing the frame and getting it bevelled.
Note the new Glass Brick feature tile to let more light in and give the room
an icy Antarctic feel!


(L) The old shower, (M) During renovation, and (R) The new open shower (shower
divider screen yet to be attached)


(L) The old tiny bath, (M) Under construction, and (R) The new deeper and longer
bath (suits two people of course!)
Note the hand painted feature tiles in the main bath/shower area. There are
5 of them in this area.


(L) During demolition, (M) new pipework, and (R) The hebel brocks forming the
bath support.


(L) The new bath after installation, and (R) the refurbished mirror with sticky
stuff on the back ready to be mounted.


Dave's custom made glass brick frame (L), and decorative custom frame surround
(R).
Just punch a whole through the gyprock wall, slide in, and glue on a frame surround
- simple.


What Antarctic themed room would be complete without hand painted feature tiles
featuring native Antarctic animals! These are totally unique and hand drawn and
painted tiles, you can't get them anywhere! They were almost too good to cement
into place on the wall, but we reluctantly did it. We have several others left
over which will be hung in the main vanity area.
The Platypus Front Door
What EcoHouse would be complete without making a grand entrance with the front
door?
Nicole designed a new front door themed around her favorite animal - the Platypus!
She designed the front door, had it custom made out of recycled oregon, and
also drew and designed the Platypus stained glass window. Dave hung the door
and installed the sylish new lock.
The colours we picked for the stained glass window are really stunning. When the light shines out at night (from the inside), or in during the day (from the outside) the colours are just so incredibly intense!


(L) The old front door. (M) Nicole after the new front door was hung. (R) The
finished front door, although the the door frame still needs more work.


(L) Dave installing the new lock. (R) Nicole selecting the stained glass colours
on a full size layout pattern.


(L)&(M) Two shots which attempt to capture the intense colour of the stained
glass. (R) Nicole's original hand drawn sketch.
The Garage


The original owners tried to convert the garage into another room. These gyprock
walls were half finished when we moved in. Yes, one of the roller doors was
gyprocked over!


Our house didn't come with much storage space, so we utilised some wall space
in the garage. Dave hand crafted three custom fitted storage cabinets out of
19mm pine, at great expense to the management. They are bricked screwed into
the wall with 300mm stayed angle brackets. These suckers aren't coming down
in a hurry! The photos show the cabinets before all of the doors were fitted.


Not really part of the renovation, but very cool anyway... Dave constructed
4 of these purpose designed DVD storage draws for the new entertainment unit
(made out of recycled oregon of course).
The Outdoor Entertainment Area


The back deck is made from recycled Tallowood timer, as is the single piece benchtop beneath the window. The deck height was made to match the back door, no more tripping over!


We ripped out the old BBQ from across the yard and installed this 5 burner BeafEater hooked up to permanent gas in place of a sad looking garden against the house.

We also replaced the outdoor seat with new plantation timber slabs, with an additional seat where the old BBQ used to be. And no outdoor area is complete without a brazillian hammock!
Eco Additions
Passive Heating
Solar driven heating would be a great way to make our house warm without contributing greenhouse gases to the atmosphere.
We monitored the temperature inside the house, inside the roof and outside the house to determine if a simple heater that worked on the principle of drawing the hot air from the roof into the house would be a viable way to heat the house in winter.
The graph below shows that the roof space doesn't heat up significantly enough to raise the inside air temperature (it reaches a maximum of 25 degrees) to a level that will keep the house warm and reduce the need for additional heating. We did, however, find that despite outside fluctuations the inside air temperature remains relatively stable which is confirmation of the benefits of in-wall insulation (which we were delighted to discover we had!). These graphs were also taken with about 1/4 of our insulation bats in the roof not installed, as the previous owners had removed them to install evil halogen lights.
Thermochron iButton temperature loggers were used for measurements.

We eventually designed and built an active Solar Air Heater called the Solar Sponge.
Halogen Lights
Our house came fitted out with Halogen downlights, lots of them. 9 in the lounge room, 5 in the dining room, 9 in the kitchen, and 6 in the main bathroom. At 60watts each that comes to a total of around 1700 watts if you have them all on at once!
They came out quick smart and were replaced with compact fluro fittings. Now we have 3 in the kitchen, one in the dining, and 4 in the loungeroom. A grand total of around 120 watts, a energy saving of over 90%!!, for an equivalent light output. Not that they are all on at once anyway.
All of the other lights in the house were also converted to compact fluro.
Email: david AT alternatezone DOT com
Copyright (c) 2005 David L. Jones